| Balance Point
Theory - by Warren Gardiner On monoplane wings
the balance point can usually be defined
as between 25 and 30 percent of the
average chord of the wing, but the ideal
value could vary according to the wing-section
used and other variables. A simple way
The theory is that
the lift generated by the wingsection
when totalled has a resultant at
approximately 30% of the average chord of
the wing. This means that the force
generated by the lift is exerting an
upward pressure at this point on the wing,
opposed by the weight of the model which
is centred at the same point and
resulting in a total force which is then
either upward, downward or constant.
If these two forces
are not opposed ie. nose-heavy or tail-heavy,
the model's flight charecteristics will
change to the extent that it may become
totally uncontrollable. A nose heavy
model with a balance point forward of 25%
of the average wing-chord will have a
tendancy toward a nose-down attitude,
while a tail-heavy model would have a
tendancy toward a nose-up attitude which
would result in the wing stalling. For
example: a paper-plane which is nose-heavy
tends to start pointing it's nose toward
the ground as soon as it is released and
hit the ground, while a tail-heavy paper-plane
would have the tendancy to point it's
nose upward until it stalls, recover and
then start pointing it's nose upward
again.

On monoplanes this
theory is relatively simple to implement,
simply calculate the mean aerodynamic
chord and then 25 to 30 % of this value
to get the ideal balance range.

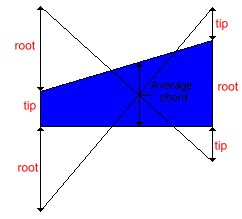
The mean
aerodynamic chord or average chord of a
wing is simply put, the average width of
the wing between leading and trailing
edge. The mean aerodynamic chord of
tapered wings can be most easily
calculated by using the method shown
below.

To simplify things somewhat
here is a balance point calculator which
will simplify these calculations for you:
Balance point calculator
On biplanes and other multi-wing
models, the calculation of the balance
point changes changes, with more than one
flying surface, one has to calculate the
average chord of each of the wings
individually and the balance point for
each of these wings, and then the average
of all of the balance points to come to a
final balance point.

TOP
Maiden Flights -
by Warren Gardiner
Firstly go
through your preflight checks, as
prescribed by your local model flying
club or Model flying organisation. A
simple checklist will look like this:
- Make
sure that all control links are
secure,
- all
servos are fitted and sturdy
- all
controls are working correctly,
- all
hinges are fitted securely and
won't pull out in flight,
- the
undercarriage is secure and
sturdy,
- the
engine is mounted solidly, and
all screws are tight and wont't
rattle loose,
- no
control slop, all flying surfaces
are strong and sturdy,
- no
metal to metal linkages which
could cause interference,
- the
batterypack and receiver are
packed in foam and won't move
around at all,
- the
prop is balanced and right for
the engine
If in
doubt about anything on your model
consult a qualified instructor or your
local hobbyshop.
The first
flight of your brand new model is
probably the most nerve-wracking and
possibly dangerous flight of all. If you
are not comfortable maidening your own
model, you should definitely ask your
local flying club's instructor or some
other capable person.
If
maidening your model yourself, first get
comfortable with your transmitter, making
sure that you will easily be able to
reach the trims while flying if necessary(usually).
Once you're comfortable with your model
and transmitter, double check that all
the controls are the right way around and
you're ready for the first flight.
Start the
engine and make sure that the engine is
set up correctly, hold the model in a
vertical position with the engine running
full throttle for a few seconds, if it
dies, the engine is too lean, if not and
it sounds the same while running with the
model horizontal the engine is probably
set up right. If you have a new engine in
it, first run it in as specified in the
engine's instruction manual or ask you
local hobby shop.
First taxi
around a bit to get to grips with the
ground handling and once comfortable line
up into the wind with the engine on idle.
Open the throttle slowly to full throttle,
and steer the model down the center of
the runway. Once the model is at full
speed and about 2 thirds of the runway,
whichever comes first, feed in a little
up elevator, and it should slowly lift
off. At this point you have to be pretty
careful, the model might be in need of
trim in that it needs either up or down
trim, so slowly release the up elevator.
If the model dives, pull up until the
model is at the right attitude, and keep
that amount of up held until you are at a
safe height at which time you can release
the elevator and feed in some trim. On
the other hand, the model might be in
need of some down trim, in that it takes
off prematurely, or keeps climbing. If
this happens, feed in some down until it
comes to the right attitude, be sure to
not overcorrect, the model might point
itself directly down into the runway,
destroying your beautiful new model. At a
safe height, the down elevator can be
released and trimmed to fly straight and
level. If the trim tabs are not
sufficient for your model to fly straight
and level, close the throttle, keeping
the model at a straight and level
attitude, and land as soon as possible,
this is extremely difficult if the model
requires down trim, since then you have
to push the stick forward to fly straight
and level and release it to flare for a
landing which is almost directly opposite
to conventional landings where you
release the stick to fly straight and
level and pull back on the stick to flare.
The flight
checklist for a new model's maiden flight
should look like this:
- Trim
the model to fly straight and
level.
- Test
that the control movements are
enough by doing some flat figure
eights.
- Fly a
few circuits to get used to the
model.
- At a
safe height, slow the model down
by closing the throttle to idle
and get accustomed to it's low-speed
handling charecteristics and
glide.
- Do a
few landing approaches.
- Land.
In the
event of a sudden engine cut, the first
thing to do is to inform the pilots
around you(if any) that you have a
deadstick and make sure that the runway
is clear. Glide directly toward the start
of the runway, if you are at a reasonable
height, do a small circle or two to lose
height and make sure that you will not
overshoot or not reach the runway. Glide
in and land, but be sure not to slow the
model down too much and stall, even on
idle an engine supplies enough power to
prevent a stall at the same speed as
landing deadstick. If you don't make it
to the runway, simply level out in a
clear area and handle it as any other
landing, the model won't be totally
destroyed and only a minimum of damage
can be expected.
TOP
Undercarriages
- by Warren Gardiner
Many
problems caused on take-off and landing
are usually as a result of undercarriage
problems, particularly so in the case of
taildraggers.
On of the
biggest problems concerning taildraggers
is ground-looping, where the model
suddenly spins around and is difficult to
control on take-off, landing and during
taxying. The cause of this is the general
lining up of the wheels, if the wheels
are both pointing slightly in, it is
called toe-in, when they are pointing
away from each other it is called toe-out.

The best
option on a taildragger model is to
intentionally put in some toe-in on the
wheels, this helps the model run straight
on the runway. This is because that when
the model goes slightly off course, eg.
to the left, the right wheel will cause
more friction (because it is at an angle
to the direction of travel) than the left
which is running straight and true now.
This action swings the model back in the
opposite direction helping it to keep
tracking straight.


The
placement of the undercarriage on your
model is also important. On tricycle
undercarriages the mainwheels have to be
behind the center of gravity to keep it
on all three wheels, however it is best
to keep them as near as possible to the
center of gravity. This is due to the
elevator having to work harder to lift
the nose of the model and rotate the
model when the mainwheels are further
back.
The
placement of the undercarriage on
taildragger models is also important and
this also has to be as close as possible
to the balance point of the model,
conventionally as the model picks up
speed, the tailwheel lifts off the ground
and as soon as the model is at it's
flying speed it will lift off either by
itself or with a little up elevator fed
in. With a more forward undercarriage the
wind over the tail is not enough to lift
the tail into the air because of the
lever effect caused by the distance
between the balance point of the model
and the mainwheels. Moving the mainwheels
nearer the balance point minimises this
lever effect and the tail lifts into the
air more easily.
TOP
Hinges - by
Warren Gardiner
The right
hinges and fitting of hinges are a very
important part of your model. Always
choose a good well-known brand of hinges
and the right hinges for the job,
There are
many types of hinges available as well as
hinging methods: ranging from standard
nylon or plastic pinned hinges to CA
hinges and surface hinges. For club
models and general sport models pinned
nylon hinges and CA hinges are the norm.
For information on the types of hinges
available and the correct use thereof
speak to your local hobbyshop or members
of your flying club in the know.
The first
thing to do when fitting hinges is
cutting the slots in which your hinges
will fit, the slots will have to be of
the same thickness as the hinges being
used. There are many commercial tools
available such as hinge - slotting kits
and electric tools but these are not
always available or present in the
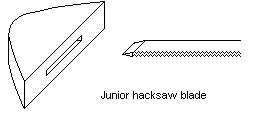
average workshop. For nylon hinges a
simple method is to use an old junior
hacksaw blade from which the pin has been
removed and the point sharpened.

Fortunately
CA hinges(Cyano Acrylate hinges) are
relatively thin and generally require
nothing more than a sharp blade cut by a
hobbyknife for a slot.
The next
step is to fix the hinges in place, CA
hinges are so named because that is how
they are affixed, simply fit the hinges
once the model is covered and drop a few
drops of superglue on the hinges and they're
permanently stuck.
Nylon
pinned hinges usually require a little
more effort. Be careful of using
superglue to affix pinned hinges, the
superglu is most likely to end up in the
hinge joint and end up jamming it, so it's
best to use some epoxy squeezed into the
hinge slots and wiped clean and then fit
the hinges. Another option is to use pins
right through the control surface and the
hinge and cut off flush with the surface,
but epoxy is usually a safer long-term
option.
TOP
|

